Within a Program: How to Design a Journey
Last updated: July 17, 2026
A Journey defines the path your targets move through as your program runs. You set up stages (the major milestones) and steps (progression within a stage), then attach conditions that automatically move targets forward based on real CRM/MAP and signal data.
Before you start
You'll need an Admin or Manager role. If you're using HubSpot Marketing Activity conditions, your HubSpot integration needs to be connected with sync enabled.
Get started
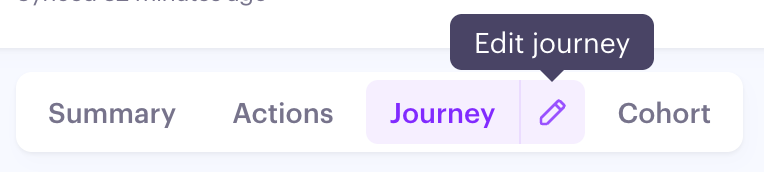
Open the Journey tab in your Program. Click the pencil icon to start editing.
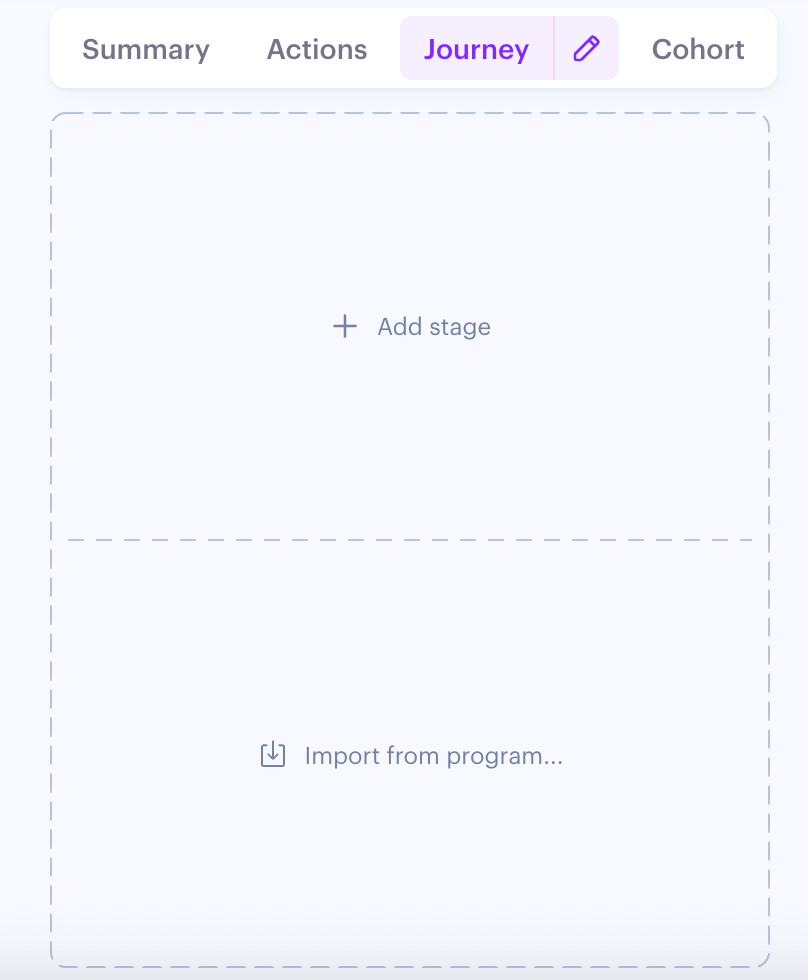
If the journey is empty, you have two options:
Click Add stage to configure a new journey or
Import from Program to copy the structure from another program. Your copy is independent, so changes won't affect the original.
Build your stages and steps
Edit mode opens with the default stage in place. It can be renamed, but can't be deleted or reordered.
Click Add stage to create your first column.
Name the stage. Give it a name that reflects where the buyer is (for example, "Awareness", "Engaged", "Decision").
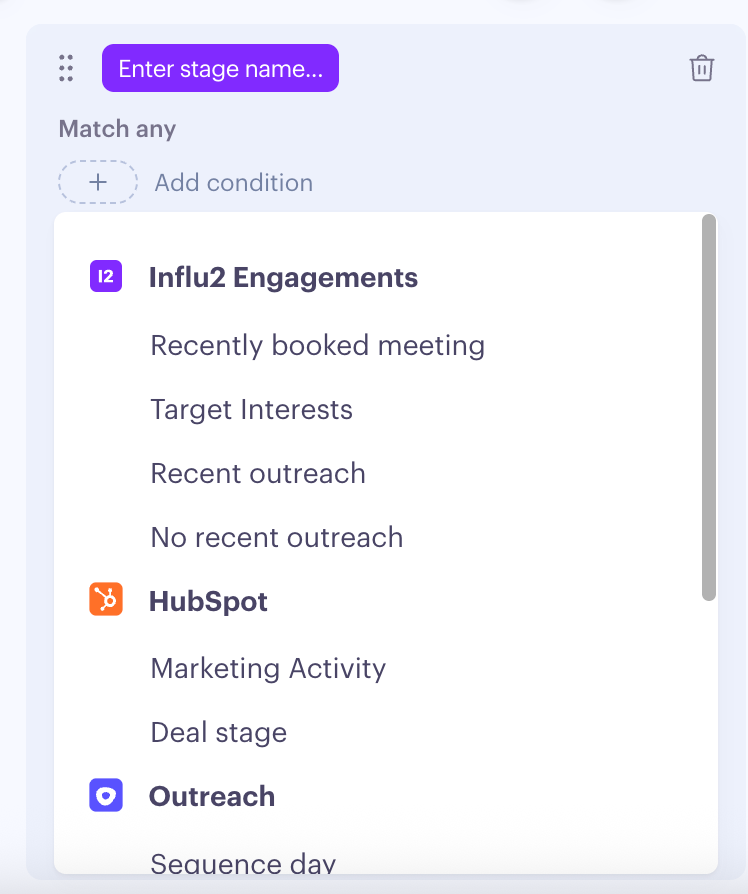
Add direct conditions to determine who enters the stage. A new stage needs at least one direct condition before you can save. The available types depend on what's connected:
Influ2 engagements — Recently booked meeting, Target interests, Recent outreach, No recent outreach
Salesforce — Opportunity stage, Account field, Contact field, Opportunity field, Campaign Member Status, Number/Amount fields, Date field, and text, picklist and boolean fields
HubSpot — Deal stage, Form Submission, Webpage View, Email Click, Email Open, Event Attendance, Event Registration, Number/Amount fields, Date field, and text, picklist and boolean fields
Outreach — Sequence day
Keep in mind: the first stage cannot have entry conditions — it's the entry point for all targets. Conditions apply from the second stage onward.
Inside each stage, click Add steps. Steps let you define and track progression within a stage..
Name the step and add sequential conditions. Sequential conditions decide who moves from one step to the next. Types include:
Influ2 engagements — Target ad clicks, Target ad visits, Target ad impressions, Outreach touchpoints, Days without outreach, Days spent in the step, Days in the step since first impression, Days in the step since the ad launch, Any target in buying group interested in [topic] in the last [N] days
Salesforce — Account field, Contact field, Campaign Member Status
HubSpot — Form Submission, Webpage View, Email Click, Email Open, Event Attendance, Event Registration
A step needs at least one sequential condition on its incoming transition before you can save.
Drag steps to reorder them inside a stage. Steps can only be reordered within their own stage. When you reorder, the sequential conditions on either side of the moved step reset — Influ2 will warn you before applying.
Click Save

Limits
Limit | Cap |
|---|---|
Stages per Journey | 15 (including the default) |
Steps per stage | 15 |
Stage Condition Examples
The available conditions depend on what you have connected to Influ2. Here’s how each one works and how to configure it.
Influ2 engagement data
Recently booked meeting: Use when sales has booked a meeting with someone at the account, and you want to surface specific content to prep them for the call.
To Configure it:
Select Recently booked meeting as the condition type.
Set the time window (in days) the meeting must have been booked within.
Keep in mind: when one target on an account hits this condition, every other target on that same account moves with them. The condition isn't available on the first stage, and the same time window can't be reused across multiple stages.

Target interests: Use when a prospect has signaled interest in a topic — through ad clicks, content engagement, or detected intent signals. Tailor the next round of content to that topic.
To Configure it:
Select Target Interests as the condition type.
Pick the topics that should trigger the transition.
Keep in mind: each topic can only be used once per journey. If a target matches conditions on more than one stage at the same time, they'll move to the deepest matching stage.
Recent outreach / No recent outreach: Use when you want to gate progression on whether sales has reached out — Recent outreach moves targets when they've been contacted in the last X days, No recent outreach moves them when they haven't.
To Configure it:
Select Recent outreach or No recent outreach as the condition type.
Enter the number of days.
CRM Data: Contact and Account Fields
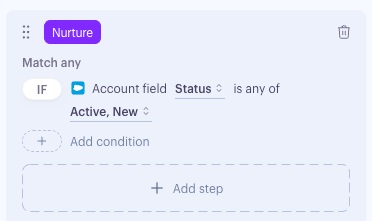
Use Contact or Account field conditions when your sales process is tracked in CRM picklists — like Lead Status, Account Tier, or Lifecycle Stage — and you want a journey to transition as soon as a value updates.
Configure it:
Select Contact field or Account field as the condition type.
Choose the field name from the list.
Select one or more field values that should trigger the transition.
CRM data: Opportunity and Deal fields
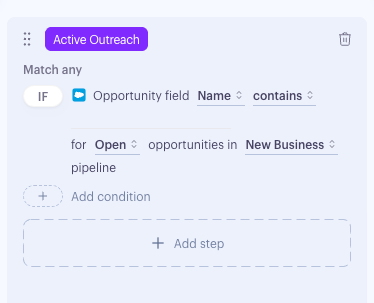
Use Opportunity (Salesforce) or Deal (HubSpot) field conditions to move targets based on the deals tied to their account — for example, when a specific product line shows up on an Open opportunity in your enterprise pipeline.
Configure it:
Select Opportunity field (Salesforce) or Deal field (HubSpot) as the condition type.
Choose the field name.
Pick the operator and select one or more field values.
Filter by opportunity status: Open, Lost, or Won.
Pick the pipelines this should apply to.
Keep in mind: only fields surfaced in your Journey Fields settings show up here. Status definitions follow the CRM — for Salesforce, Open is IsClosed = false; Lost is IsClosed = true and IsWon = false; Won is IsClosed = true and IsWon = true.
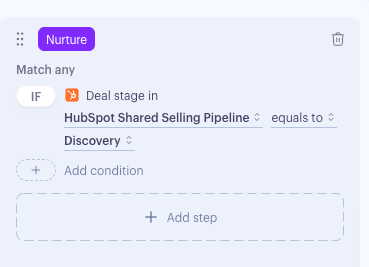
CRM data: Opportunity stage and Deal stage
Use this when your sales process is tracked through pipeline stages and you want the journey to mirror how the deal is progressing.
Configure it:
Select Opportunity stage (Salesforce) or Deal stage (HubSpot) as the condition type.
Choose the pipeline.
Pick the stage name(s) that should trigger the transition.
Keep in mind: every target tied to the same account moves together when the stage condition is met.
Campaign Member Status (Salesforce)
Use this when a target's Campaign Member Status in a Salesforce Campaign changes to a value you specify. It's the cleanest way to sync journey progression with the campaigns your team is already running in Salesforce.
Configure it:
Select Campaign Member Status as the condition type.
Choose the Salesforce Campaign.
Pick one or more status values that should trigger the transition.
Add additional Campaigns the same way — Influ2 evaluates them with ANY logic, so a match on any Campaign + Status pair triggers the move.
Keep in mind: each Campaign + Status pair can only be used once across stage conditions in a journey (the same pair is allowed on multiple steps). Active and inactive Salesforce Campaigns both appear in the dropdown. If a Campaign or Status is later deleted in Salesforce, the condition simply won't fire.
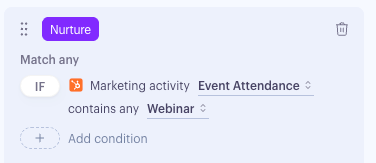
HubSpot Marketing Activity
Triggers when a contact performs a specific action in HubSpot. Supports 6 activity types:
Activity type | Filter applies to |
Form Submission | Form name |
Webpage View | Page URL (canonical) |
Email Click | Email subject |
Email Open | Email subject |
Event Attendance | Event name |
Event Registration | Event name |
Configure it:
Select HubSpot Marketing Activity as the condition type
Choose the activity type
Set the filter: contains a value you enter
Keep in mind: - Conditions are evaluated against live-synced HubSpot data. Only activity that happens after the condition is created will trigger it. If your HubSpot integration is disconnected or sync is turned off at any point, the condition won't appear as an option and won't be evaluated until the connection is restored.
Salesloft Cadence
Use this when your sales team runs Salesloft cadences and you want the journey to react when a target reaches a specific day of a cadence.
Configure it:
Select Cadence day as the condition type.
Pick the Salesloft cadence.
Choose the day number that should trigger the transition.
Keep in mind: this condition relies on your Salesloft integration being connected. If a target isn't enrolled in the cadence yet, the condition won't trigger — pair it with a Stage action that adds them to the cadence on entry.
Outreach sequence
Use this when your team runs Outreach sequences and you want a journey transition to fire when a target hits a specific day of the sequence.
Configure it:
Select Sequence day as the condition type.
Pick the Outreach sequence.
Choose the day number that should trigger the transition.
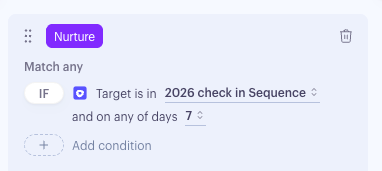
Keep in mind: this condition requires your Outreach integration to be connected. If a target isn't enrolled in the sequence, the condition won't trigger — use a Stage action to add them to the sequence on entry.
Measuring Journey Progression
The Journey tab opens to a horizontal map of your stages, with steps inside each one. Each stage and each step displays two key numbers:
Audience count — the number of targets currently on that stage or step. Use it to see where targets are clustering — a stage with most of your audience and a step with almost none usually means a condition is too tight.
Delta — the change over the date range selected in the Program header (positive shown in green, negative in red). Use it to gauge velocity — how quickly targets are moving through the journey.
Hover any audience count to see a tooltip with Targets in (everyone who entered this stage or step in the period) and Targets left (everyone who moved out). Both are clickable — clicking opens the Audience slideout filtered to those targets, so you can see exactly who fed the count.

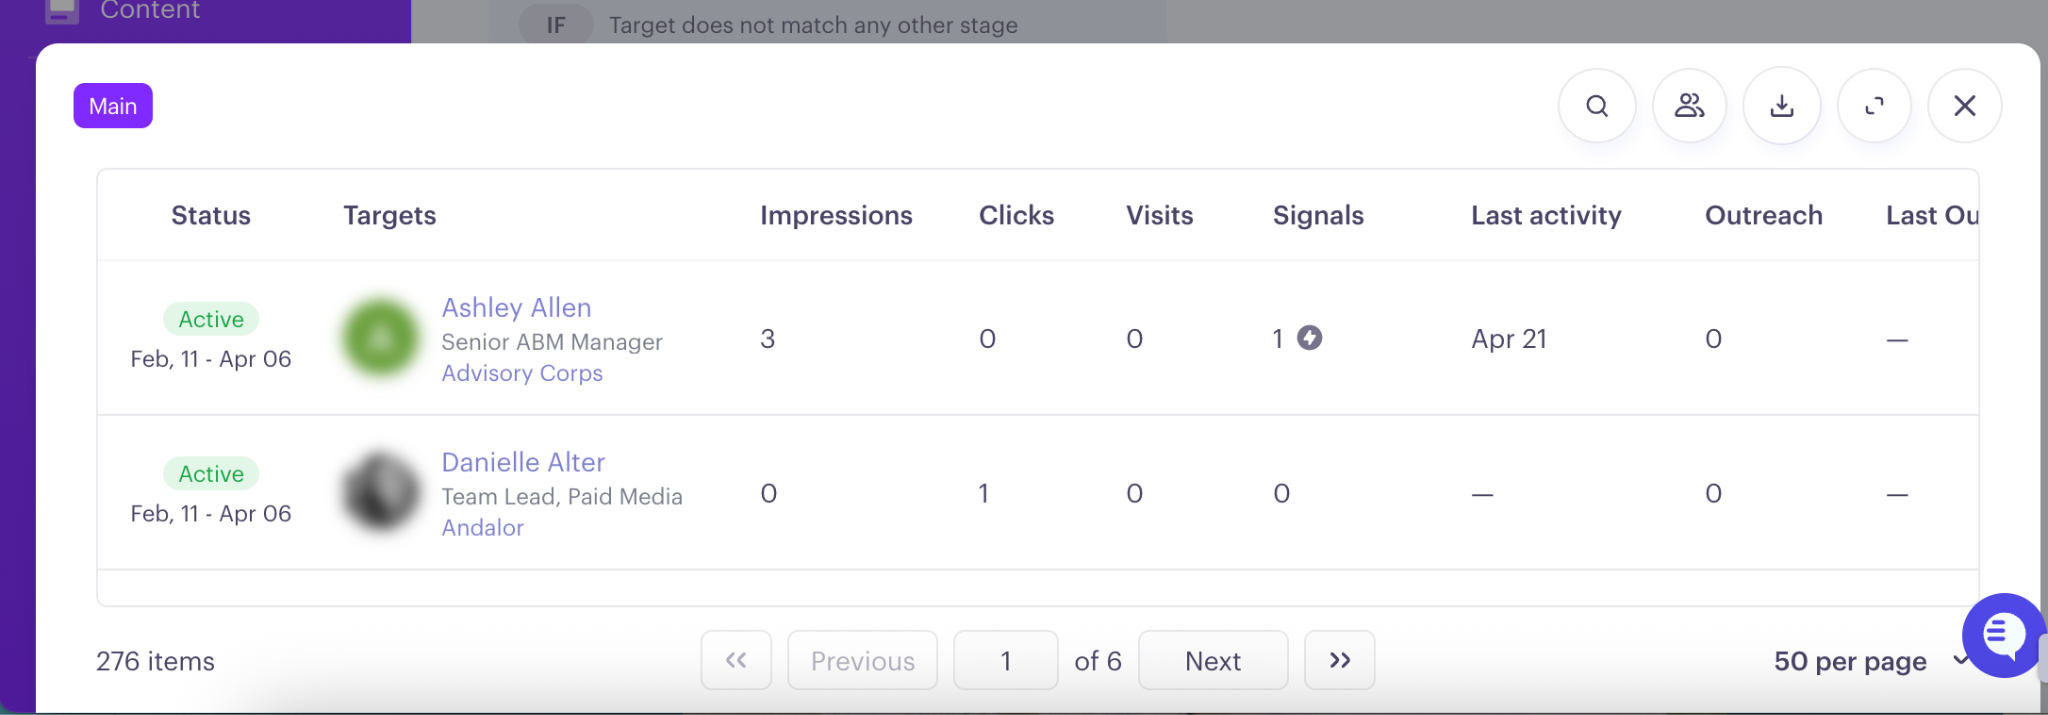
Conditions display under "Match any" or "Match all" headers, with a transition count next to each one (how many targets moved by that condition). Condition lists are collapsible, expanded by default.
If you've edited or deleted a condition during the selected period, Influ2 keeps it visible in grey so you can see exactly which historical conditions drove past transitions, alongside any active conditions.
Save
Click Save when you're done. Influ2 will recalculate targets according to the defined criteria.
Influ2 preserves your journey's history. After saving changes to a live journey, the read-only view shows both your current conditions and any historical (greyed-out) conditions, so you can understand past performance even after refining the journey.
What's next
With your journey in place, go to the Actions tab to attach ad content, CRM actions, and sales sequences to each stage.